
H. G. Dietz
http://aggregate.org/hankd/
Department of Electrical and Computer Engineering
Center for Visualization & Virtual Environments
University of Kentucky, Lexington, KY 40506-0046
Initial release: October 17, 2010; last updated December 9, 2012
This document should be cited using something like the bibtex entry:
@techreport{cleaning20100727,
author={Henry Gordon Dietz},
title={{Cleaning Camera Equipment}},
month={July},
year={2010},
institution={University of Kentucky},
howpublished={Aggregate.Org online technical report},
URL={http://aggregate.org/DIT/CLEAN/}
}
If your travels are not confined to a well-filtered clean room, your camera equipment gets dirty. Using a lot of different lenses doesn't help, because the innards of both your camera and lenses are unprotected while you're changing lenses. This document is a summary of the cleaning methods that I, Professor Hank Dietz, have encountered either personally or as part of my research at the University of Kentucky. The opinions expressed here are my own and should not be construed as anything more than that -- my opinions.
This is a controversial point, but I believe that equipment you use in the field must get dirty. Increasing entropy is natural and unavoidable if camera equipment is used as intended.
Many people go nuts buying protective cases for their equipment and/or wrapping it in rubber or neoprene. For the most part, I think that just makes it harder to see all the stuff trapped inside with and in your equipment. I especially avoid using felt-lined cases in the field, because the felt easily absorbs moisture which can foster growth of fungus, mold, etc. If the seal on your camera/lens/case is really great, that keeps stuff inside just as much as it keeps stuff out; e.g., the stuff that got in when you changed your lens is trapped inside. Even cool-looking "grippy" camera body wraps trap in heat, which may be a problem with warm batteries and DSLRs that have sensor-heating movie modes....
I do believe in protecting the camera and lenses from shocks (force and temperature) and splashes, and making things easier to carry is good, but I think a little exposure to the environment is what these devices were designed for. My camera equipment is always "going commando" -- with simple external protection only. Generic padded cases and straps are sufficient. Given that I can see how dirty it is, I'm regularly aware that I need to clean the equipment... which I do.
The bodies of cameras and lenses often have lots of little indentations and corners that can collect dust and dirt. However, in the 40+ years I've been using cameras, I have never seen one functionally impaired by this kind of external grime. It might not be appealing, but this stuff is virtually harmless....
Of course, it will not be harmless if you start to push that grime inside of things, so cleaning is something that should have the goal of keeping dirt from getting inside, rather than maximizing beauty of the outside.
Dry cleaning usually doesn't do much for a camera body, and can build a static charge. That said, I have sometimes used a vacuum cleaner to suck dirt out of cracks where it might otherwise have worked crud into the camera body during wet cleaning.
I find that all of the following "wet clean" methods can work, provided that "wet" really means not damp enough for moisture to migrate into anything. These can be applied using paper towel and/or cotton swabs:
Although people love to hide their lenses behind lenscaps (or "covers"), you cannot use 'em that way. They also make glass covers -- UV filters -- that you can shoot through, but a flat filter in front can add some pretty visible artifacts, mostly in the form of reflections and/or flare. I only use a filter to protect the lens when conditions are truly nasty, e.g., with water splashing toward my lens.
The first thing to realize is that most lenses are much more easily messed-up by stuff getting inside than by bad things happening to the exposed front of the glass. For example, wet cleaning fluid can seep around the front lens element and migrate along the internal surface or between glued elements, causing rather nasty problems. One also has to be much more careful about the rear element than about the front, because defects there generally have much more impact on image quality.
The standard procedure for cleaning a lens is something like:
Fundamentally, you should not worry about cleaning your lens in the field unless the dirt has an adverse impact on image quality or the stuff on your lens has the potential to get into the coating or seep around element edges. Beyond an air blower, it is usually better to wait until you are in a cleaner environment, but avoid storing lenses dirty -- that could encourage things like fungus.
Note that the viewfinder eyepiece, and even the displays on your camera body, should be treated much like lenses for cleaning.
As of May 2011, I have added this section because way too many lenses have stuck open apertures -- and not necessarily for the reason everybody talks about.
I'm not advocating taking lenses apart unless there is a desperate need, and even then take apart only what you must. Do the disassembly in a clean environment over a tray or cloth that will keep tiny parts from being lost... because it is quite common that an amazingly tiny ball bearing will be responsible for something as significant as the click-stops on an aperture ring. However, getting an aperture unstuck can make a huge difference in usability of a lens, and might not require as much disassembly as one would think....
The classic stuck aperture diagnosis is oil on the aperture blades. The oil is generally responsible for an increase in friction as the blades slip over each other, and that can cause sticking in lenses with automatic apertures (preset lenses usually work fine with a little oil on the blades). Certainly, there are plenty of lenses with this issue, sometimes because the grease used on the focus helical broke-down over time into a sticky sludge and a light oil which then flowed into places it should not be in. In such a case, it is sometimes necessary to take apart the entire lens for cleaning. However, it might be possible to be far less aggressive, only opening the lens enough to get access to the iris from one side (either front or back). Lightly wiping the thin oil from the blades with a Q-tip, working the aperture, and repeating, has been temporarily effective for at least one lens I own. It also helps to mop-up any excess grease around the helical by using a Q-tip in any openings easily accessible.
The surprise for me was that a lot of lenses -- especially old Kiron-built Vivitars -- seem to have apertures that stick open despite being perfectly dry! The problem seems to be rooted in auto-aperture mechanisms that hold the aperture open when the lens is not in use. Over many years in the open position, the spring that closes the aperture seems to become weaker. In such a case, just opening the lens and gently, directly, pushing the internal aperture control lever often will stop-down the lens. Working the aperture control some more can help further. It may be possible to effect a complete repair simply by replacing the spring with one providing greater force -- or by just shortening the existing spring a little to provide greater force. In fact, more spring tension will often make an oily aperture work too.
If your aperture is not working for a reason other than the above, good luck. It is very easy to wreck a lens by disassembly followed by incorrect re-assembly. Certainly, I would never be taking the aperture blades individually out of a lens -- that process is too error prone for home repair. Some mounts tend to make things more difficult than others, primarily by having more little levers for communicating with the camera body. Document each step taking it apart by taking a photo of the lens; these photos help a lot in getting the lens back together.
If you've got an interchangable lens, it's gonna happen. You don't even need to actually change the lens... the mere fact that you could, usually means that there are at least some paths for dust to flow through the lens and find its way onto your sensor. Let's explain that. There are several ways dust and dirt can get in:
The bad news is that the sensor surface is way more sensitive to dirt, scratches, etc. than most people realize. The good news is that it isn't really the sensor that is exposed -- in most cameras, it is the (Bayer) color filter, low-pass (blur) filter, or NIR blocking filter that is actually exposed to the air within the mirror chamber. Their thickness also means that we are talking primarily about dirt casting shadows on the sensor rather than interfering with the sensor's semiconductor structure, and those shadows could even be diffuse enough to make the dust nearly invisible. Still, these filters are thin pieces of glass, and they and their coatings can be quite fragile.
The first line of defense is the frequent use of hand air blowers. They work great, except when they do nothing.
Here's what my Sony A350 sensor looked like after a year of accumulating the stuff my blower could not remove:
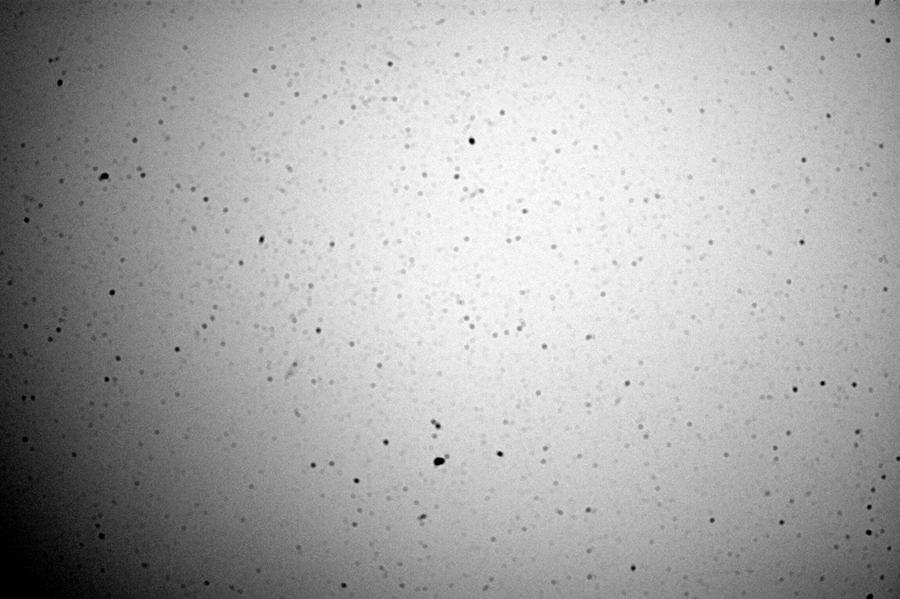
Fortunately, that looks much worse than it typically seems. The trick is that the shadow cast by dust is a function of the projection characteristics of the lens, not just of the sensor structure in the body. Using the quality-maximizing aperture of f/8 or so on most lenses shows only a few faint shadows; the above image was shot at f/22. The shorter the focal length and the smaller the aperture the more defined the shadows tend to be; the above was at 20mm. The image is a deliberately out-of-focus evenly-lit wall shot with an 8s exposure and the camera continuously moving to further even the image... but the image was converted to B&W and run through "auto levels" in GIMP to emphasize the flaws.
Here's what it looks like after a few minutes cleaning with the Lenspen SensorKlear:

Well, actually, the after shot was 30s at f/32 and 20mm, but that's even a bit more demanding. (This was taken with a Sigma 10-20mm zoom, and f/22 was as far as it would go at 10mm before zooming to 20mm, whereas I realized for the second shot it could go to f/32 at 20mm.) There is still plenty of stuff on the sensor that I'm sure I can remove in another pass or two, but the improvement is really striking.
For what it's worth, I used the SensorKlear pen with articulated tip and the lighted loupe that has a gap on one side so you can get the pen in while using the loupe. Here are the steps I used:
Overall, not a bad experience... just scary. I'll even admit that I wouldn't be surprised if this type of contact cleaning can cause micro scratches, etc. -- but that's better than the dust farm it was, and fluid cleaning worries me more in that I can easily imagine traces of fluid being left or getting where they shouldn't. My understanding is that "wet cleaning" for sensors, as for lenses, is really supposed to be more like "very slightly damp cleaning."
It is now October 2010. Several months have passed since I wrote the bulk of the above, and I continue to be impressed with the SensorKlear and have not needed anything more than that and a hand blower for sensor cleaning. In fact, the A350 sensor doesn't seem to be getting dirty as fast after having been cleaned with the lenspen. Perhaps there was some residual effect from the manufacturing process which use of the lenspen cleared? My A100 never has accumulated dust as quickly and still has not needed anything more than a puff of air.
I now also have a Sony NEX-5, which leaves the sensor much more exposed when changing lenses. Each of my Sony A350 and NEX-5 when brand new had a large chunk of dirt visible. On the A350, it looks like a spiral chip from drilling something. It was easily cleaned with a puff of air but later showed-up on the focus screen. On the NEX-5, the blob looks like a ball of dust. Neither one showed at all unless the lens was stopped down to f/8 or so and they appeared at the top of the frame (which is really the bottom in the camera). I suspect they are manufacture or assembly remnants caught in the well at the bottom of the sensor which is intended to catch and hold debris from the sensor.
It is now June 2011. Guess what? My NEX-5 has been collecting dust easier than my A100 or A350, but thanks to the shallow mount, most has been easy to remove with a puff of a blower. A couple of stubborn dots came off easily enough with a lenspen -- after I realized that the lighted magnifier works much better against a mount adapter on the NEX rather than against the raw E-mount flange. It isn't just that the short flange distance makes the magnifier less effective, it also is that the angling into the side of the magnifier does not give the optimal angle for cleaning on the shorter mount.
I've also stumbled upon this LensRentals Lens Cleaning Methods page, which is in very close agreement with my view of things. Actually, those folks have a lot of useful articles posted.
Well, it is now December 2012, and I realized that I didn't add a mention here of the fact that I have now wet-cleaned my NEX-5. I used ordinary alcohol on a Q-tip -- actually transfer of a tiny bit by touching a dry Q-tip to a wet one -- and it trivially removed the one really persistent spot. I still think wet cleaning is dangerous, and using random fluids is even worse (I did it in an act of desperation), but it really worked perfectly. The truth is that the glass over the sensor isn't much different from glass in a lens... the positioning makes it a lot touchier, but the surface is comparably robust.
A somewhat exotic, but clearly superior, cleaning method for seriously dirty optical surfaces involves coating the surface with a liquid polymer (i.e., Photonic Cleaning Technologies First Contact). The polymer dries into a sheet that embeds the dirt and thus allows it to be lifted off. I don't have any optics that are dirty and expensive enough to warrant this treatment, so I've never tried it, but it seems clear that this is one of the few cleaning methods that can be used on things as touchy as first-surface mirrors. This method is really targeted at cleaning telescope optics, and may have more issues with flowing into threads and other lens mount structures with the much smaller optics typically used for cameras. This might be a good way to rescue an EVIL sensor that got splattered with mud during a lens change.... ;-)
The worst "normal" cleaning issue I know of is getting dirt off a focus screen. Unfortunately, the polymer would probably attack the material used to make most focus screens, so the best solution for this problem may well be buying a new screen.
![]() The only thing set in stone is our name.
The only thing set in stone is our name.